什么是 PyWebIo
PyWebIO 提供了一系列命令式的交互函数来在浏览器上获取用户输入和进行输出,将浏览器变成了一个“富文本终端”,可以用于构建简单的 Web 应用或基于浏览器的 GUI 应用。 使用 PyWebIO,开发者能像编写终端脚本一样(基于 input 和 print 进行交互)来编写应用,无需具备 HTML 和 JS 的相关知识; PyWebIO 还可以方便地整合进现有的 Web 服务。非常适合快速构建对 UI 要求不高的应用。
PyWebIo 的特点
- 使用同步而不是基于回调的方式获取输入,代码编写逻辑更自然
- 非声明式布局,布局方式简单高效
- 代码侵入性小,旧脚本代码仅需修改输入输出逻辑便可改造为
Web服务 - 支持整合到现有的
Web服务,目前支持与Flask、Django、Tornado、aiohttp、FastAPI(Starlette)框架集成 - 同时支持基于线程的执行模型和基于协程的执行模型
- 支持结合第三方库实现数据可视化
安装
pip3 install -U pywebio
入门例子
我们用这个例子,来实现对数据的提交和检验。
from pywebio.input import *
from pywebio.output import *
from pywebio.pin import *
from pywebio import start_server

def input_input():
    # input的合法性校验
    # 自定义校验函数

    def check_age(n):
        if n<1:
            return "Too Small!@"
        if n>100:
            return "Too Big!@"
        else:
            pass

    myAge = input('please input your age:',type=NUMBER,validate=check_age,help_text='must in 1,100')
    print('myAge is:',myAge)

if __name__ == '__main__':
    start_server(
        applications=[input_input,],
        debug=True,
        auto_open_webbrowser=True,
        remote_access=True,
        )

更多用法
input
# 输入框
input_res = input("please input your name:")
print('browser input is:', input_res)

# 密码框
pwd_res = input("please input your password:",type=PASSWORD)
print('password:', pwd_res)

# 下拉框
select_res = select("please select your city:",['北京','西安','成都'])
print('your city is:',select_res)

# checkbox
checkbox_res = checkbox("please confirm the checkbox:",options=['agree','disagree'])
print('checkbox:', checkbox_res)

# 文本框
text_res = textarea("please input what you want to say:",rows=3,placeholder='...')
print('what you said is:',text_res)

# 文件上传
upload_res = file_upload("please upload what you want to upload:",accept="image/*")

with open(upload_res.get('filename'),mode='wb') as f: # 因为读取的图片内容是二进制,所以要以wb模式打开
    f.write(upload_res.get('content'))
print('what you uploaded is:',upload_res.get('filename'))

# 滑动条

sld = slider('这是滑动条',help_text='请滑动选择')  # 缺点是不能显示当前滑动的值
toast('提交成功')
print(sld)

# 单选选项

radio_res = radio(
    '这是单选',
    options=['西安','北京','成都']
    )
print(radio_res)

# 更新输入项

Country2City={
    'China':['西安','北京','成都'],
    'USA': ['纽约', '芝加哥', '佛罗里达'],
}

countries = list(Country2City.keys())

update_res = input_group(
    "国家和城市联动",
    [
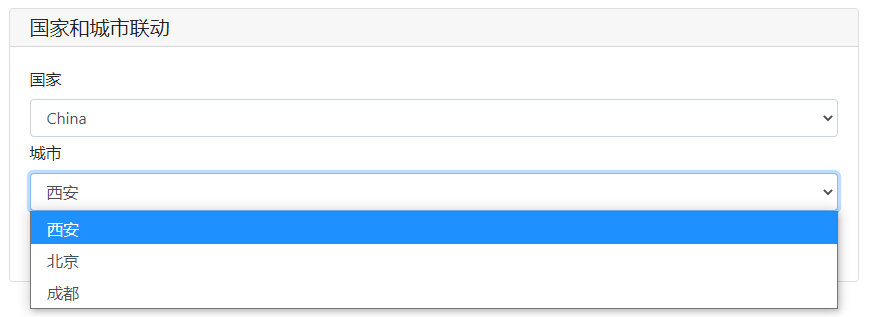
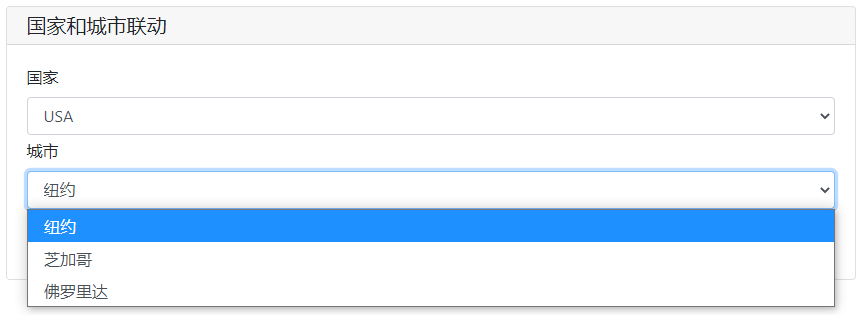
        # 当国家发生变化的时候,onchange触发input_update方法去更新name=city的选项,更新内容为Country2City[c],c代表国家的选项值
        select('国家',options=countries,name='country',onchange=lambda c: input_update('city',options=Country2City[c])),
        select('城市',options=Country2City[countries[0]],name='city')
    ]
)

print(update_res)


output
# 文本输出
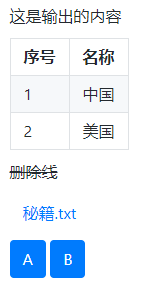
put_text('这是输出的内容')

# 表格输出
put_table(
    tdata=[
        ['序号','名称'],
        [1,'中国'],
        [2,'美国']
    ]
)

# MarkDown输出
put_markdown('~~删除线~~')

# 文件输出
put_file('秘籍.txt','降龙十八掌')

# 按钮输出
put_buttons(
    buttons=['A','B'],
    onclick=toast
)
部分高级用法
# ========================== 1-输入框的参数 ==============================

# input的更多参数
ipt = input(
    'This is label',
    type=TEXT,
    placeholder='This is placeholder',  # 占位
    help_text='This is help text',  # 提示
    required=True,                  # 必填
    datalist=['a1', 'b2', 'c3'])    # 常驻输入联想
print('what you input is:',ipt)

# =========================== 2-输入框自定义校验 =============================

# input的合法性校验
# 自定义校验函数

def check_age(n):
    if n<1:
        return "Too Small!@"
    if n>100:
        return "Too Big!@"
    else:
        pass

myAge = input('please input your age:',type=NUMBER,validate=check_age,help_text='must in 1,100')
print('myAge is:',myAge)

# ============================ 3-代码编辑 ============================

# textare的代码模式

code = textarea(
    label='这是代码模式',
    code={
        'mode':'python',
        'theme':'darcula',
    },
    value='import time\n\ntime.sleep(2)'
    )
print('code is:',code)

# ============================== 4-输入组 ==========================

def check_age(n):
    if n<1:
        return "Too Small!@"
    if n>100:
        return "Too Big!@"
    else:
        pass

def check_form(datas):
    print(datas)
    if datas.get("age")==1:
        #return 'you are only one years old!'
        return ('age','you are only one years old!')
    if len(datas.get("name"))<=3:
        return ('name','Name Too short!!!')

# 输入组
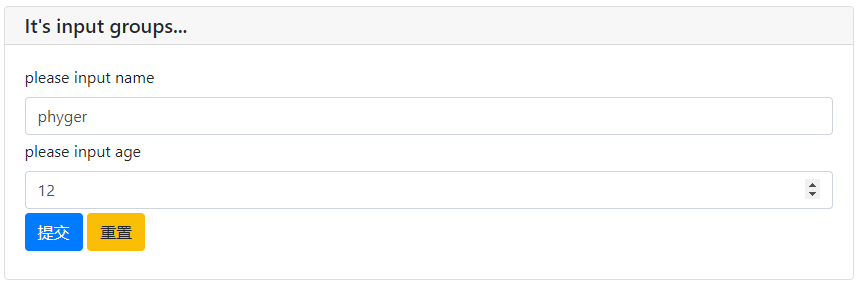
datas = input_group(
    "It's input groups...",
    inputs=[
        input('please input name',name='name'),
        input('please input age',name='age',type=NUMBER,validate=check_age)
    ],
    validate=check_form
    )

# ====================================== 5-输入框的action =========================================

import time

def set_today(set_value):
    set_value(time.time())
    print(time.time())

tt = input('选择时间',action=('Today',set_today),readonly=True)
print(tt)

# ====================================== 5-输入框的弹窗 =========================================

def set_some(set_value):  # 此方法可以将选择的英文转换为中文
    with popup('It is popup'):    # popup 是 output 模块中的方法
        put_buttons(['Today','Tomorrow'],onclick=[lambda: set_value('今天','Today1'),lambda:set_value('明天','Tomorrow2')])   # set_value('今天','Today') 按Today的按钮输入Today1,实际对应:今天
        put_buttons(['Exit'],onclick=lambda _: close_popup())

pp = input('go popup',type=TEXT,action=('按钮弹窗',set_some))
print(pp)




代码中的
参考
以上就是今天的全部内容了,感谢您的阅读,我们下节再会。




评论区